A detailed paper model rewards patience much more reliably than heroics. The trick is to stop seeing a theatre and start seeing a series of manageable jobs: check the print scale, sort the pieces, make one sound module, then use it as the standard for the next. By the time the roof goes on, most of the difficult decisions should already have been made on the cutting mat.
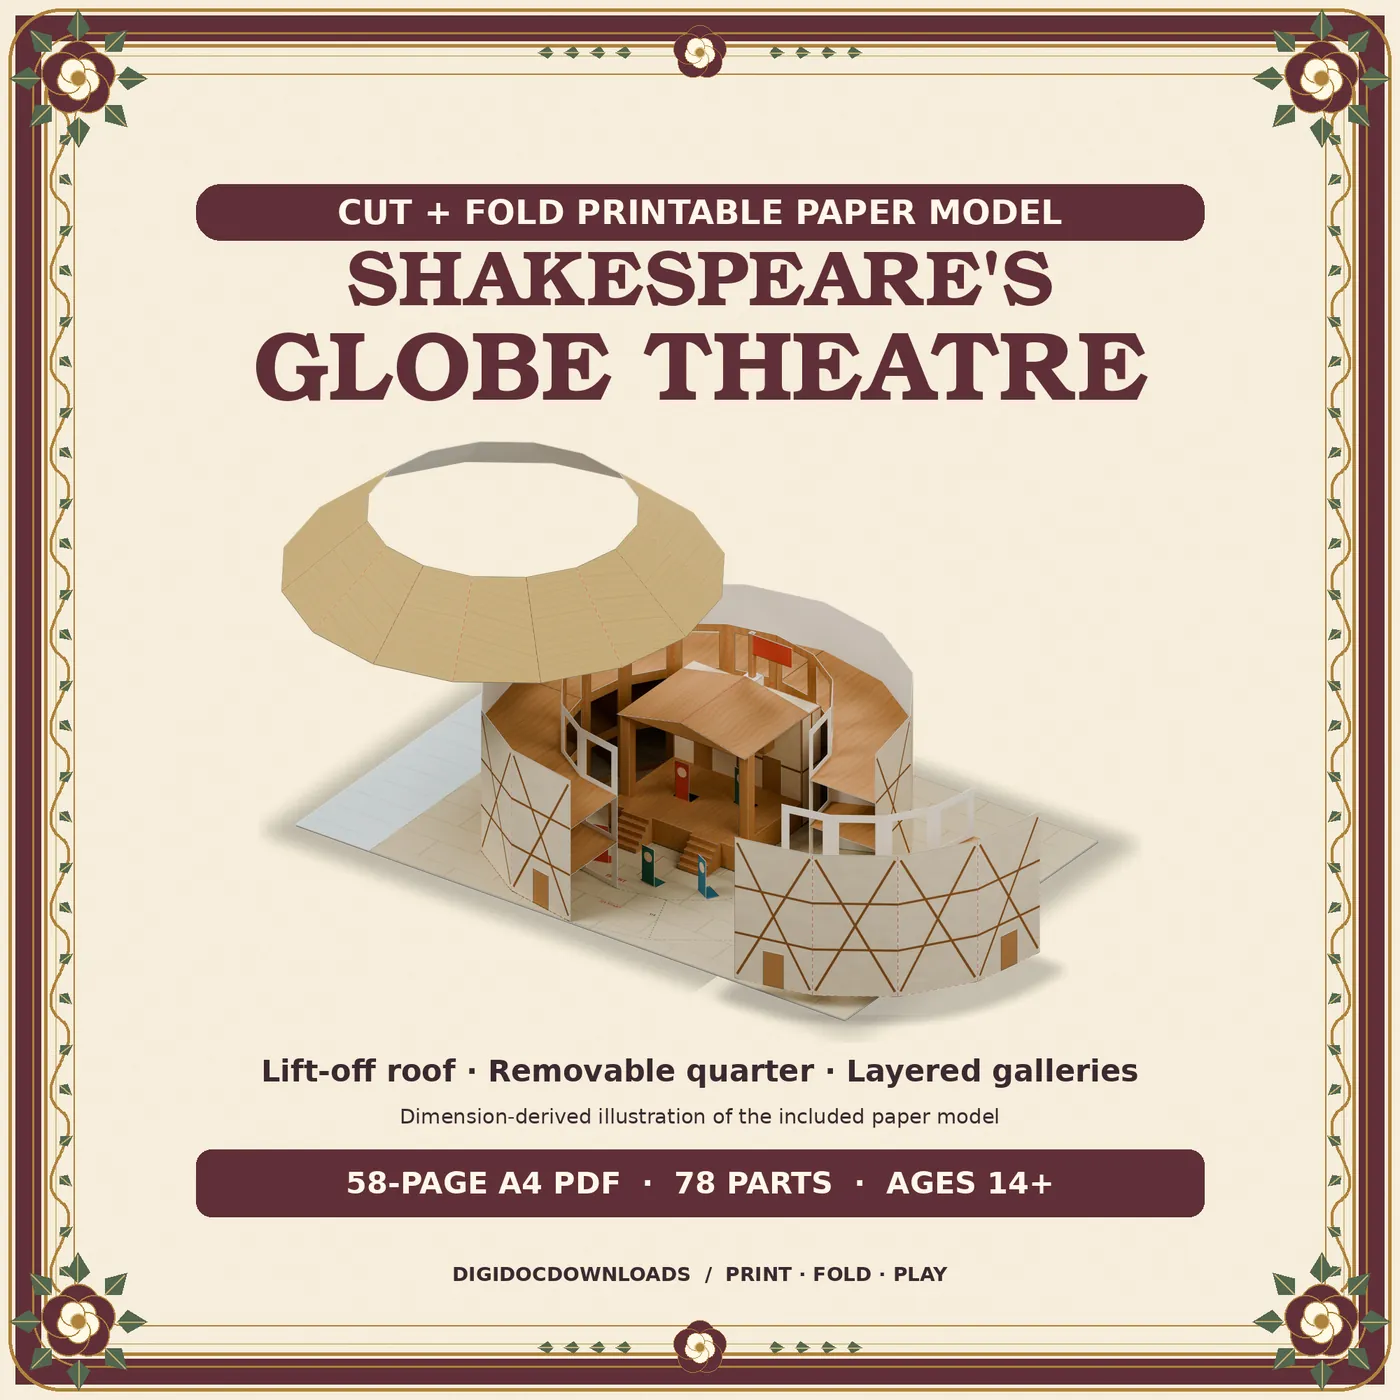
The Shakespeare’s Globe Theatre printable model contains 58 A4 landscape pages, 78 labelled pieces, 20 illustrated steps and four join clinics. It builds a sixteen-sided educational interpretation with an open yard, ground gallery, two raised gallery decks, a projecting stage, tiring house, balcony, supported canopy, two stair structures and removable roof and front-right quarter. This companion guide adds workflow and troubleshooting; the supplied numbered instructions remain the authority for tabs, piece labels and exact assembly order.
Understand the building before cutting it into pieces
Outdoor playhouses were designed around the relationship between performers and audience. Shakespeare’s Globe explains that the modern theatre has galleries surrounding a wide open stage, while its guide to early modern playhouses describes a central yard open to the sky, a raised stage projecting into it, a roof over the stage known as the heavens and a tiring house behind. Those features give the model its logic: the circular-looking shell frames a sequence of inward-facing spaces rather than hiding a conventional room inside.

It is also useful to know what the model is not. The exact original Globe cannot be recovered like a flat-pack instruction leaflet. Historic England’s scheduled-monument record describes surviving wall foundations and floor evidence that support a polygonal form, alongside documentary and pictorial evidence. The kit therefore says plainly that it is an educational interpretation rather than an exact archaeological reconstruction. Accuracy here means being honest about the evidence as well as attentive to the glue tabs.
Prepare a build station with three zones
Use one area for uncut sheets, one for cutting and scoring, and one clean area for assembly. Add a shallow tray or envelope for tiny labelled pieces. You will need a printer, 160–200 gsm matte card, scissors, PVA glue, a ruler, a blunt scoring tool, tweezers and a cutting mat. If internal windows or sockets need a craft knife, an adult should handle it. Keep a damp cloth nearby for fingers, not for the model.
Print one-sided at Actual Size or 100%, with page scaling switched off. Print the page containing the 50 mm ruler first and measure it with a physical ruler. A two-millimetre error can seem trivial on one wall but becomes a small architectural opinion once repeated around sixteen sides. If the gauge is wrong, correct the printer settings before using card or ink on the remaining pages.
Create a piece register before the first cut
Keep the instruction pages separate and scan the entire piece list. Make four working groups: outer structure, galleries and decks, stage and tiring-house details, and removable or display elements. Within each group, arrange pieces by their printed labels rather than apparent shape. Several rectangles may look interchangeable until one owns the only tab that reaches the next module.
Cut only the pieces needed for the next illustrated step. Write the label lightly in pencil on the reverse if a cut removes it from view. Return offcuts to recycling as you go so that a narrow structural strip is not mistaken for scrap. At the end of each session, place every unfinished part with a note showing the next step number. This is less glamorous than a dramatic pile of components, but dramatically more useful.
Score first, fold second, glue third
Score fold lines against a ruler using a blunt tool and light pressure. The aim is to compress the surface, not cut through it. Test your pressure on the waste margin of a printed sheet. Fold each tab before adding glue and run a clean ruler edge gently along long creases. Consistent folds matter more than force, especially where several gallery bays must meet around a curve.
Use a thin, even layer of PVA. Too much glue wets the card, encourages warping and lengthens drying time; too little leaves corners lifting. Apply it with a cocktail stick or small scrap of card where the tab is narrow. Hold the join until it grips, then support it with a clean clip, folded paper cradle or small weight that does not mark the printed surface. Never race a damp joint into the next one.
Dry-fit the sixteen-sided shell
Before gluing a complete ring, stand the relevant wall modules together on a flat surface and check that the printed edges, deck levels and opening align. This dry-fit reveals a reversed piece or fold before it becomes a permanent feature. Join a few bays at a time, alternating sides when the instructions allow, and keep returning the growing section to the flat surface.
Do not force the final join closed. A gap usually means one earlier fold is not square, a tab is caught, or the assembly has crept out of alignment. Trace the problem backwards while the joins remain flexible. The goal is a regular polygon, not a perfect circle; the visible facets are part of the model’s construction and reflect the polygonal interpretation supported by archaeological evidence.
Build the galleries as repeating modules
Treat each gallery level as a sequence of repeated structural decisions. Complete one bay carefully, compare it with the diagrams, then use it as a reference for the others. Check that deck supports sit fully against their registration points and that the deck edge stays level from bay to bay. A small set square is helpful, but a folded corner of spare card gives a perfectly respectable right-angle check.
Let the ground gallery establish the footprint before adding the two raised decks. Work around the structure in short sections and allow opposing sections to dry before adding weight above them. Keep the front-right quarter separate wherever the supplied sequence directs; its removability is a feature, not a suspiciously large leftover. Test the quarter after each nearby stage so glue or a drifting rail does not quietly turn it into a permanent wall.
Give the stage its own careful session
The projecting stage, tiring house, balcony and canopy form the visual centre of the model. Assemble them when you are fresh and the main shell is stable. Check the stage is level in the yard and that the tiring-house face sits square behind it. Dry-fit the canopy supports before gluing either end; paired columns are far easier to correct while both are still merely considering the arrangement.
The architecture helps explain the performance space. Shakespeare’s Globe describes how the present theatre’s stage projects into an open yard, with spectators in the yard and surrounding galleries. Its page on the Third Globe also explains that the modern reconstruction includes practical differences required by current safety and comfort. Keep that distinction in mind when comparing the model with contemporary photographs: reconstruction is evidence interpreted through a working modern building.
Add stairs, doors and people without crowding the work
Complete the two stair structures away from the main shell and let them dry before installation. Use tweezers to place narrow cheeks and tabs without pressing surrounding rails. Applied doors should follow their labelled positions; lay them out in order before gluing. The eight audience standees are best saved until the structural work is complete, when they can add scale without volunteering as finger holds.
Use the removable quarter to check sight lines into the yard, galleries and stage. If a stair or standee catches when the section is lifted, correct the obstruction rather than trimming a structural edge by guesswork. The model is intended to reveal how the spaces relate, so every removable part should lift cleanly and return to a natural resting position.
Fit the roof last and preserve the reveal
Dry-fit the removable roof with the shell resting on its display board. Check that it sits evenly without squeezing the upper gallery. If it rocks, inspect the highest points beneath it for a tab or rail that has lifted. Correct the cause with gentle pressure and drying time rather than weighting the roof into submission. The roof should be removable so the completed interior remains part of the display.
Add the flag and mast only after the roof fits reliably. They are conspicuous, delicate and unusually good at finding sleeves. The Bankside display board, locator diagram, timeline, facts and learning challenges can then turn the finished model into more than an ornament: use the open quarter to identify the yard, gallery decks, stage, tiring house and canopy, then compare those features with the official Globe Theatre overview.
Troubleshoot small errors before they become structural
- If a ring will not close, check earlier folds, caught tabs and reversed modules before trimming anything.
- If card warps, stop adding parts, support the piece flat and let the glue dry fully.
- If a deck slopes, compare support heights and registration marks around the nearest two bays.
- If printed edges turn white, touch them sparingly with a matching dry coloured pencil after assembly.
- If a removable section sticks, locate the contact point and correct the neighbouring tab rather than forcing it.
- If a label is lost, return to the full sheets and diagrams; do not identify a structural piece by shape alone.
- If you need to stop, bag the current module with its label and write down the next illustrated step.
A realistic multi-session plan
Session one is for printing, the 50 mm gauge and organising. Session two can cover careful cutting and scoring for the first structural group. Use later sessions for the shell, gallery decks, stage complex, stairs and details, allowing glue to dry between them. Reserve the final session for the removable roof and quarter, audience figures, flag, display board and a slow inspection from every side.
The finished theatre should feel like a readable building rather than a test of endurance. Keep the numbered sequence beside you, make one reliable module at a time and use every dry-fit as permission to change course before the glue decides otherwise. When the roof lifts and the front quarter comes away, the reward is not merely a complicated object completed. It is a clear view of how an open-air playhouse gathered stage, audience and architecture into one lively space.
Explore Shakespeare’s Globe Theatre
More to read, make and discover
A few useful, interesting and checked routes into the subject.
- Theatre architectureShakespeare’s Globe: Globe Theatre
Official introduction to the modern Globe’s stage, galleries and audience relationship.
- Playhouse featuresShakespeare’s Globe: Playhouses
Official guide to common outdoor-playhouse features including the yard, projecting stage, heavens and tiring house.
- Reconstruction contextShakespeare’s Globe: The Third Globe
Official explanation of the present reconstruction and ways it differs from the original theatre.
- ArchaeologyHistoric England: Globe Theatre scheduled monument
The statutory record summarising the surviving archaeological evidence and the basis for a polygonal interpretation.